Warning:
This article is not meant for enterprise use. Looking back at this I also think, DefProf didn't work with the Administrator user.
Windows Server 2019 Proxmox Template
Creating and deploying a Windows Server 2019 template on Proxmox
This post is about creating a template for Windows Server 2019 on Proxmox, selecting some default settings and deploying a first VM from that template.
Base configuration
To create a new VM on Proxmox we first need to select a name. As this will be a Windows Server 2019 Datacenter template with desktop experience, I will call it tpl-w19-dc-gui.
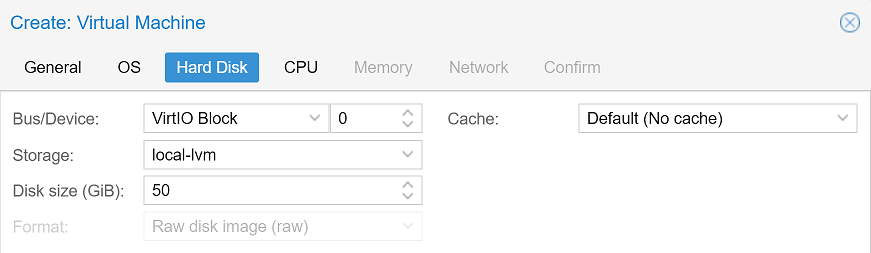
We will use a little more than the minimum system requirements for Windows Server 2019:
- 2 CPU cores
- 1 GB RAM (you might wish to set this a little higher as the configuration below can get really slow)
- 50 GB disk space
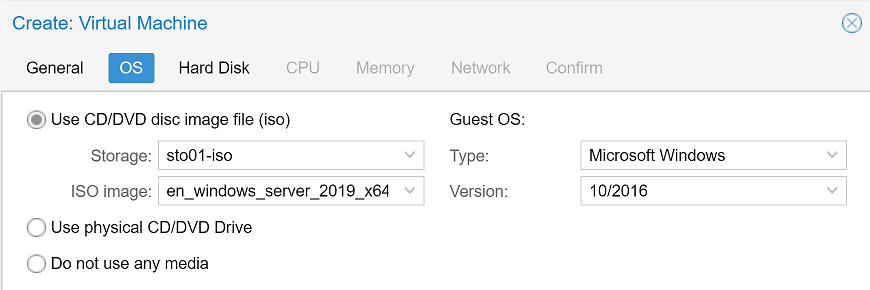
As our first disc image file we will select the installation ISO for Windows Server 2019 datacenter. Selecting Windows 10/2016 as Guest OS is fine for now.
In the next step we select the VirtIO Block as our VMs harddisk device to get a better performance - which requires the VirtIO drivers, which we will install in the next step.
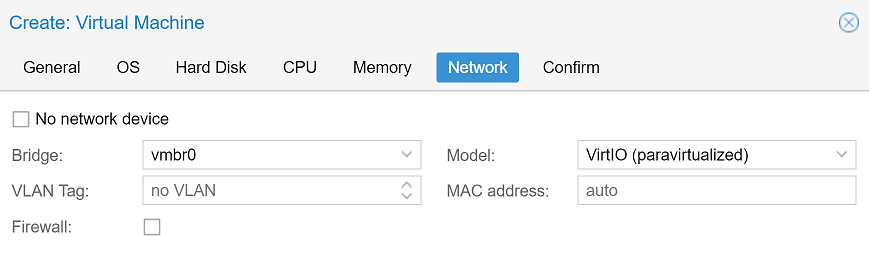
We can now set our CPU cores to 2 and the RAM to 1 GB. For the network device we will change the model to VirtIO (paravirtualized).
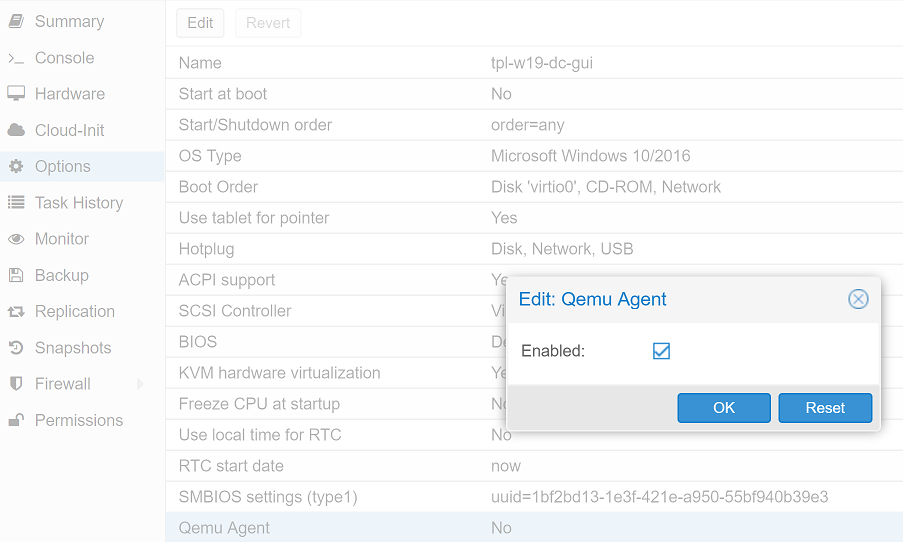
The configuration of the VM is now nearly finished. The last step is to activate the QEMU Guest Agent:
VirtIO drivers
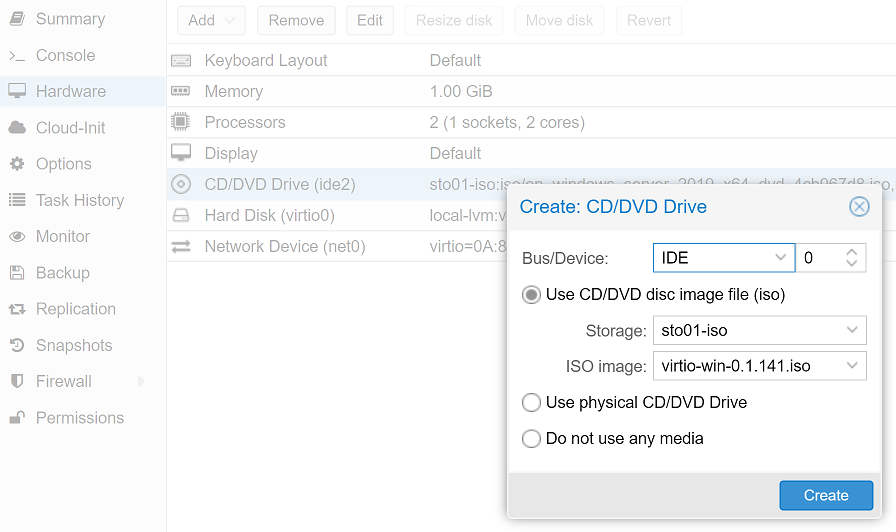
To get the VirtIO devices working and some more performance in the OS we need the corresponding drivers (disk, network adapter and balloon driver). The VirtIO bundle also contains the QEMU Guest Agent which allows better integration of the guest OS with QEMU/Proxmox. The VirtIO-win Repository contains a dynamic link to the current stable release of VirtIO. At time of creation of this post the current version was VirtIO-win 0.1.141 which will be used from here on.
To install the OS to our VirtIO harddisk, the corresponding driver needs to be available. Therefore we just add another DVD drive with the VirtIO ISO.
Windows installation
The VM is now prepared and can be started. The installation process will start automatically. Select the desired locale settings and click Install now. Insert your product key (you will have to insert it again after every deployment, but you need an activated version for some settings). You could use KeePasses Auto-Type function to insert the key through the console automatically.
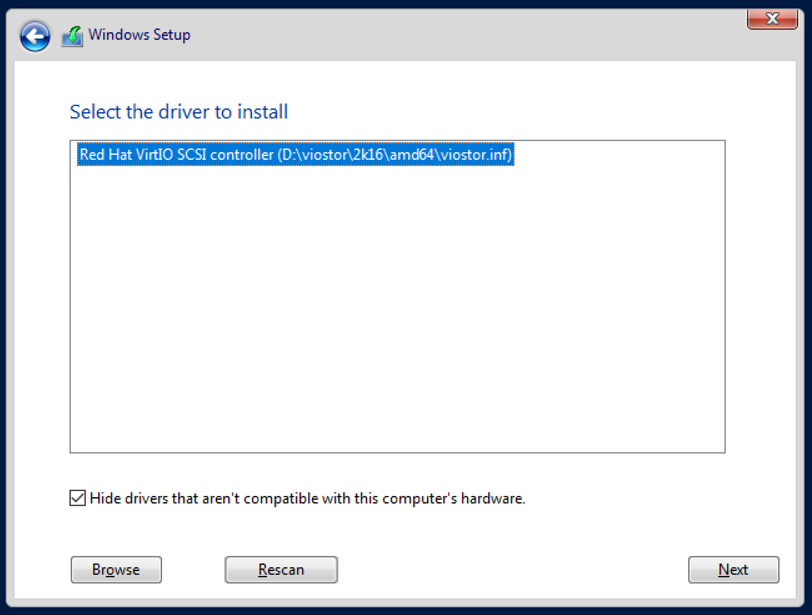
Select your version of Windows Server 2019. For this post I’ll go with Windows Server 2019 Datacenter (Desktop Experience). Select the custom installation option. There will be no drives displayed as we are missing the required drivers. We can load them from our VirtIO ISO using the Load driver option. Select the correct driver using Browse. The storage driver is located at <CD-Drive>:/viostor/2k16/amd64 - yes, you need to select this exact folder.
Click Next and the hard disk will appear. Next again and let Windows take care of the installation process. To set a strong default password, you can use KeePasses Auto-Type again.
Driver and Guest Agent installation
When the installation has finished, we can login with the previously set password. Now the other VirtIO drivers need to be installed. Open up the device manager and select Update driver for each device with an exclamation mark. Browse for the VirtIO CD-drive and let Windows search and install the right drivers each time.
At time of writing the guest agents on the VirtIO ISO are not up-to-date enough for Windows Server 2019. The latest version of QEMU Guest Agent can be found in the VirtIO-win Repository as above. Download and install from there.
Windows Updates
This is the point where you should start searching for and installing Windows Updates. You should check this process multiple times during the customization and again at the end. If you want to override some of the default Update policies, you can do so with local GPOs at Computer Configuration / Administrative Templates / Windows Components / Windows Update.
Customization and default settings
There are a few things you might want to change in your template, some of which could also be set via domain GPO. Here are some ideas:
- Enable RDP:
- Inside the Server Manager select
Local Server. SelectRemote desktopand set it toAllow remote desktop connections to this computer.
- Inside the Server Manager select
- Enable Telnet Client:
- Inside the Server Manager select
Local Server. Scroll down toRoles and Features, click onTasks > Add roles and features. Install the featureTelnet Client.
- Inside the Server Manager select
- Disable IE Enhanced Security Configuration:
- Inside the Server Manager select
Local Server. On the right hand side selectIE Enhanced Security Configuration.
- Inside the Server Manager select
- Disable Server Manager:
- Inside the Server Manager go to
Manage > Server Manager Properties. SelectDo not start Server Manager automatically at logon.
- Inside the Server Manager go to
- Set Windows Explorer to display file extensions.
You can find more recommendations on default Windows Server settings on Google, most simple settings for Windows Server 2016 work on 2019 just fine.
Installing tools
Now is the time to install some often needed tools. Here are some ideas:
- Install Windows Admin Center from http://aka.ms/WACDownload
- Install Chocolatey
choco install 7zipchoco install notepadpluspluschoco install sysinternals
- …
Final steps
To keep all those custom settings the default profile needs to be changed as our current user will be deleted. We can use a tool called DefProf for that. Create a new temporary user if you have been using the Administrator till now and use that one to run defprof Administrator. If you were using a different user, switch to the Administrator and run defprof <username>.
Check Windows Updates again, then clear the event logs using wevtutil el | Foreach-Object {wevtutil cl "$_"}.
Run C:\Windows\System32\Sysprep\sysprep.exe, select Enter System Out-of-Box Experience (OOBE), Generalize and Shutdown.

When the system has shut down
- remove the second CD drive,
- reset the other one to
Do not use any media, - right click the VM in Proxmox and select
Convert to template.
Deploying
To deploy the first VM from the template, just right click it and select Clone. When the cloning process has finished, boot the system. You will be asked for your license key and the new Administrator password, that’s it.
When the system is finally up, just issue these last commands, install Windows Updates and reboot the System.
Rename-Computer <hostname>choco upgrade all -y
You can do the last steps completely via Windows Admin Console, by the way.